This post is for experienced Linux users who are interesting to install Arch Linux. However, if you’re a Linux newbie, it’s quite possible to follow the tutorial. All you need to know is how to install Windows or Linux, and what/how to run a Terminal Emulator. The tutorial is from the perspective of a fan of Graphical User Interface (GUI), who is quite lazy for using commands and/or scripts.
Here is the video of this tutorial for your convenience to follow the text.
Before we start
What a long text?
Don’t worry, it just so happens the explanation is long, but action isn’t. When you get used to the process, the whole installation may take only about 30-45 minutes depending on the speed of your system & internet.
Arch Wiki
This tutorial is more or less like a “startup” for you to get to know more about Arch Linux. However, the more you know Arch the more you may better go with Arch Wiki, https://wiki.archlinux.org/. It’s a very helpful document.
archinstall
Arch installer comes with a script named “archinstall”. In brief, this script makes it easy & comfortable for newbies. However, “archinstall” has some limitations, e.g. you cannot manually partitioning your disk. On the other hand, manually installing Arch is the best way to learn more & deep about Linux.
Our goal
Certainly, Arch Linux installation is command-based, and it’s not newbie-friendly. But this doesn’t mean it’s difficult to install. So what will you get from this tutorial? In short, Arch install from Commands to Graphical User Interface. Therefore, here I’ll try my best to share with you step by step how to achieve this goal. To clarify, I have used the steps described here to install Arch Linux onto several x86-64 systems. Although it works for me, it might not work for you. Therefore, using it at your own risk as I cannot guarantee anything.
1. Preparation and boot the installer
Download Arch install ISO file
Arch Linux ISO file download: https://archlinux.org/download/
Create boot-USB
To create a bootable USB drive in Windows 7/8/10, I recommend Rufus https://rufus.ie/en_US/. Rufus is simple & easy, also it creates a USB drive that can be read/write from Windows and Linux (with MBR partition). For Windows and/or Linux users, another choice is Balena Etcher https://www.balena.io/etcher/. Etcher’s GPT partitioning creates a USB for live-distro only, which cannot open like an ordinary USB drive to read/write.
Set BIOS to boot USB
Boot sequence/order
Turn on your system, at the very first screen when power-up press F1 or F2 or F10 or any other key according to your system’s guide on how to log in to its BIOS settings. For which key to press and how to enter BIOS, you can read more here: https://www.wikihow.com/Enter-BIOS. In BIOS, at Boot Sequence/Order set 1st boot device to USB stick/disk.
Disable “Secure Boot”
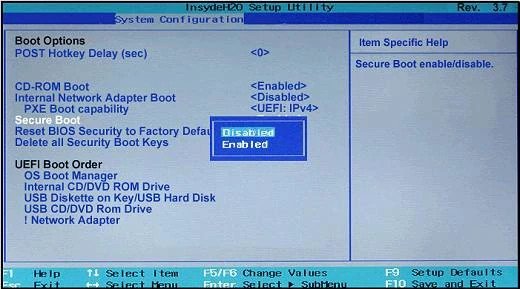
{IMPORTANT} In BIOS, find the Security Boot option and disable it. Arch Linux does not support “Secure Boot”, which means it’ll not boot into Arch Installer if this is enabled.
Let’s install it! For this, we have to boot into the Arch Installer.
2. Keyboard Layout setting
So now we are at the command prompt of the Arch Installer. First things first, we have to set the keyboard layout.
If you’re not using a “US” keyboard, then it’s time to look for your keyboard from the list by using the following command from the command prompt of the installer (and press Enter to go through the list):
ls /usr/share/kbd/keymaps/**/*.map.gz | moreTo set the keyboard layout, select its FILENAME, omitting the file’s path and extension, and then append it to the “loadkeys” command below. For example, if your keyboard is (quertz) German then its name is “de-latin1”:
loadkeys de-latin13. Wi-Fi setup for Arch installation
For the ethernet, it’s mostly plug-and-play. So here we just see into setting up the wi-fi internet connection for Arch Installer. That is to say, we are using IWD as recommended by Arch Wiki installation instruction.
iwctlAfter executing the above command, you’re put into the IWD command prompt. From there, type this to list your device:
device listSelect your wi-fi device. That is to say, in most cases, it’s “wlan0”. Further, we are looking for available networks:
station wlan0 get-networksAfter that, assuming your wi-fi interface is “wlan0” and you want to connect to “mywifi” SSID, the command is as follow:
station wlan0 connect mywifiThen enter the password for “mywifi” SSID. So now we are connected. Finally, it’s time to exit IWD and go back to the installer prompt.
exit4. Arch Boot Mode verification
Most importantly, verifying boot mode is essential for the next steps. Type the following command:
ls /sys/firmware/efi/efivarsAfter that, if “cannot access” showed, you’re in BIOS mode. Otherwise, if a list is shown, you’re in UEFI mode. Remember this mode, you’ll need it.
5. Disk & Devices creating
{BE CAREFUL!} DO NOT ACCIDENTALLY ERASE/DELETE VITAL DISK(S)! Certainly, not just Arch, for every Linux/Windows installation, this is the most important session. Therefore, be careful when you’ve to pick/create some disks to use for installing the new system onto.
5.1. “fdisk -l” to list disk status
fdisk -lAbove command opens a kind of ‘disk and devices’ detail info. Firstly, pay attention to:
- “Disk” (for example: Disk /dev/sda) is your physical disk drive, which is the actual/real HDD or SSD resides in the system.
- “Devices” – for example: /dev/sda1, /dev/sda2, /dev/sda3 – are logical disk drives, these are partitions logically allocated on your HDD/SSD.

{BIOS BOOT MODE} disk label must be “DOS”. In short, the GRUB boot loader cannot work with a “GPT” label. Therefore, if the disk is “GPT”, you have to convert it to “MBR” (DOS) with the following command (for example disk /dev/sda):
sgdisk --gpttombr /dev/sda{*} Certainly, there is a way to use a “GPT” disk in BIOS Boot Mode using Syslinux Boot Loader. However, for this tutorial, we are going with GRUB Boot Loader. For Syslinux, I may do another tutorial later.

{UEFI BOOT MODE} most recommendations are to label disk to “GPT” for this boot mode. If you want to convert an “MBR” (DOS) to “GPT”, use the following command (for example disk /dev/sda):
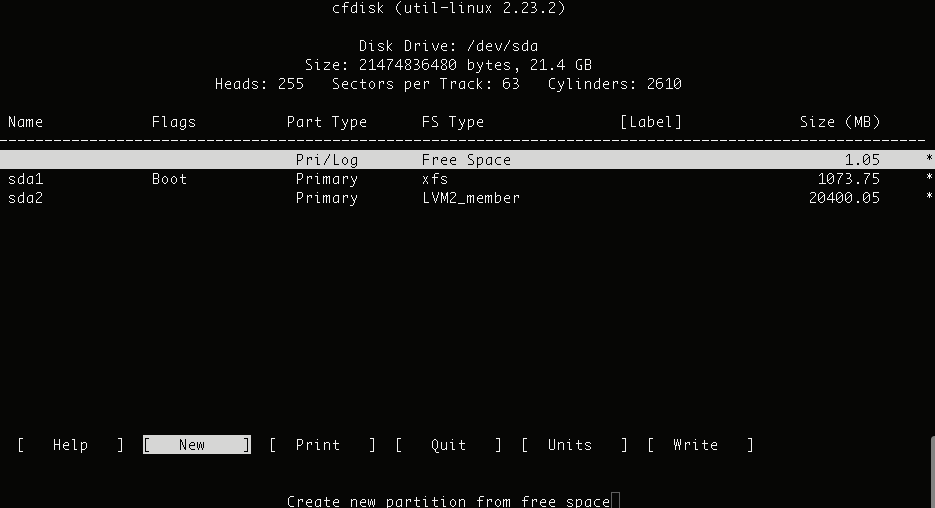
sgdisk --mbrtogpt /dev/sda5.2. “cfdisk” to create disk partition and devices
So now that you know which “disk” to work with the Arch installation, we use the “cfdisk” command to make the next tasks easier (than with “fdisk”). For example, I choose disk “sda”:
cfdisk /dev/sdaDevices map suggestion
It’s not so different for creating a disk and its devices in BIOS or UEFI boot mode. I recommend creating a Disk with 3 Devices. For example Disk “sda” with the following Devices:
- sda1 (size: 512Mb) use for BIOS or EFI boot;
- sda2 (size: 8GB) use for SWAP space;
- sda3 (size: all remaining) use for Arch Linux Root (/) and others (e.g. home, usr, etc)
Creating devices
Let’s create the disk and its devices. Use the “Up” and/or “Down” keyboard to select, and use the on-screen button [Delete] and/or [Resize] to make room for your new system disk. Following the delete/resize action, we’ll create our devices:
/dev/sda1
- [New] to create a new device;
- ‘Partition size’, for my example it’s: 512Mb;
- {for BIOS Boot Mode with disk label: DOS} set [Bootable] to show ‘*’ in ‘Boot’ column, and set its [Type] to “Linux”.
- {for UEFI Boot Mode with disk label: GPT} as there is no [Bootable] in GPT, so set its [Type] to “EFI System”.
/dev/sda2
- [New] to create a new device;
- ‘Partition size’, for my example it’s: 8Gb;
- [Type] to select “Linux swap”.
/dev/sda3
- [New] to create a new device;
- ‘Partition size’, for my example it’s all of the remaining disk, so I just press Enter;
- [Type] to select “Linux root (x86-64)” which is my system. You may select the right “Linux root (…)” of yours.
Complete devices creation
If you’re okay with each & every choice above, select [Write] then press Enter and type “yes”. When finished, [Quit].
5.3. Format devices
After quit “cfdisk”, we are back to the installer command prompt. Continuing the example “/dev/sda”, next we will format its newly created devices in accordance to the relating “boot mode”. You still remember your system boot mode, right?
BIOS boot mode (MBR)
For BIOS mode, execute the following commands one by one:
mkfs.ext4 /dev/sda1
mkswap /dev/sda2
mkfs.ext4 /dev/sda3
(format of /dev/sda3 may be a little long, just wait for all “done”)
UEFI boot mode (GPT)
Carry out the following commands, one by one. Also notice the difference in the its first line comparing to BIOS mode.
mkfs.fat -F32 /dev/sda1
mkswap /dev/sda2
mkfs.ext4 /dev/sda3
(format of /dev/sda3 may be a little long, just wait for all “done”)
{IMPORTANTLY!} In UEFI mode, “/dev/sda1” must be set to “bios_grub” for GRUB boot loader to work with it. In short, GRUB will fail and your system cannot boot into Arch Linux after installation, if not set to “bios_grub”. The following 2 commands will help you to check this status and set it accordingly if needed. (In “parted” command, device “/dev/sda1” is named as Number “1”).
parted /dev/sda print
parted /dev/sda set 1 bios_grub on
5.4. Devices mounting
Following above step, with example “/dev/sda”, we are now mounting its devices in accordance to the system boot mode. Devices mounting is needed to go on with the installation and also later for the system to work properly.
BIOS boot mode (MBR)
Take the following commands one by one. Notice line 2 and line 3 are “/mnt/boot”.
mount /dev/sda3 /mnt
mkdir /mnt/boot
mount /dev/sda1 /mnt/boot
swapon /dev/sda2
UEFI boot mode (GPT)
For UEFI mode, we will do the following commands, one by one. Importantly, line 2 and line 3 are “/mnt/efi”. These are different from BIOS mode “/mnt/boot”.
mount /dev/sda3 /mnt
mkdir /mnt/efi
mount /dev/sda1 /mnt/efi
swapon /dev/sda2
6. Arch base installation
I recommend “Linux” kernel, but you can install “Linux-lts” instead; or even install both of them so you’ll have a reservation if one failed somehow. It’s up to you.
For both BIOS or UEFI boot mode, the “base” installation command is almost the same:
pacstrap /mnt base base-devel linux linux-headers linux-firmware libinput dkms nano grub{ for UEFI boot mode } please add one additional package: efibootmgr
7. FSTAB generating
For options, choose “-U” if UUID or “-L” if Labels. Arch Wiki hints “-L” somehow make old computer runs faster.
genfstab -U /mnt >> /mnt/etc/fstab{*} If later you want to modify/adjust fstab, type the below command to enter its text edit mode and delete its content. After this, rerun the above “genfstab” command with your decided value option:
nano /mnt/etc/fstab8. CHANGE ROOT into the new system
For further installation steps, change to new system root:
arch-chroot /mnt9. SYSTEM CLOCK update
We make sure that the clock is accurate:
timedatectl set-ntp true10. TIME ZONE setup
Pick your Region
ln -sf /usr/share/zoneinfo/Now on your keyboard, press “Tab” 2 times, a list shows up. Select your Region & add it to the command. For example, “Asia”:
ln -sf /usr/share/zoneinfo/Asia/Pick your City (or a nearest one)
Again on your keyboard, press “Tab” twice for a list to show up. Select your City and add it to the command. For example, “Saigon”:
ln -sf /usr/share/zoneinfo/Asia/SaigonFull command of example /Asia/Saigon
ln -sf /usr/share/zoneinfo/Asia/Saigon /etc/localtime11. HARDWARE CLOCK setup
The following command will generate /etc/adjtime:
hwclock --systohc12. LOCALIZATION
Edit Arch “locale.gen” file
nano /etc/locale.gen{*} Look for “en_US.UTF-8 UTF-8” and uncomment it (removing #). If you want to add another, look for & uncomment it too.
{*} Use CTRL+0 and Enter to Save, then CTRL+X to Exit nano.
Generate the locale(s)
locale-gen{NOTE} The command uses dash “-“ as of locale-gen while the file uses dot “.” as /etc/locale.gen
Configuring locale(s)
nano /etc/locale.confAdd your locale(s) accordingly:
LANG=en_US.UTF-8
{*} Use CTRL+0 and Enter to Save, then CTRL+X to Exit nano.
13. KEYBOARD LAYOUT set persistent
In section “2. Keyboard Layout setting” we just set it for the installation process. In this section, we will set it to be persistent on the newly installed system. Use nano to create/edit “vconsole.conf” file:
nano /etc/vconsole.confContinue the example of the German keyboard mentioned in section “2. Keyboard Layout setting”, now in the file /etc/vconsole.conf we will add/adjust the following:
KEYMAP=de-latin1
{*} Use CTRL+0 and Enter to Save, then CTRL+X to Exit nano.
14. NETWORK configuration
Create a Hostname (name of your computer)
nano /etc/hostnameType in your decided Hostname, for example:
yourName
{NOTE} Don’t use any special characters like ~!@#$%^&*…
{*} Use CTRL+0 and Enter to Save, then CTRL+X to Exit nano.
Add/edit entries in Hosts
nano /etc/hostsAdd the following lines:
127.0.0.1 localhost
::1 localhost
127.0.1.1 yourName.localdomain yourName
{NOTE} “yourName” is the name you created in the previous step.
{STATIC IP} If your system uses a permanent IP address, it should be used instead of “127.0.1.1” above.
{*} Use CTRL+0 and Enter to Save, then CTRL+X to Exit nano.
15. ROOT PASSWORD setup
The root’s password is important, so set it up:
passwd{*} Follow the on-screen instructions, it’s simple.
16. BOOT LOADER installation
Remember your system boot mode, BIOS or UEFI? Now set GRUB boot loader accordingly (either BIOS or UEFI).
{*} Suppose that you installed grub (and efibootmgr for UEFI) in section “6. Base Installation” aforementioned.
for BIOS with MBR
Execute the following 2 commands, one by one:
grub-install /dev/sda
grub-mkconfig -o /boot/grub/grub.cfg
for UEFI with GPT
Execute the following 2 commands, one by one:
grub-install /dev/sda --bootloader-id=GRUB --efi-directory=/efi
grub-mkconfig -o /boot/grub/grub.cfg
Dual boot Windows and Arch
If you’re NOT USING DUAL BOOT, skip this step and go to the next section hereinafter. Otherwise, let’s get some tools:
pacman -S ntfs-3g os-proberNow run os-prober so it will detect any Windows Boot Loader on the system:
os-proberEdit GRUB default settings:
nano /etc/default/grubAdd/uncomment the following configuration:
GRUB_DISABLE_OS_PROBER=false
{*} Use CTRL+0 and Enter to Save, then CTRL+X to Exit nano.
Next, regenerate GRUB configurations to update GRUB entries so it will add Windows 7/8/10 bootloader:
grub-mkconfig -o /boot/grub/grub.cfg17. SUPER-USER setting
Best is to run the system with a super-user account (not root).
Set name for super-user
useradd -m yourname{!} No uppercase letter, no special characters.
Set password for new user
passwd yourname{yourname} is the name of super-user created aforementioned.
{*} Follow the on-screen instructions, it’s simple.
Set role for new user
usermod -aG wheel,audio,video,optical,power,storage yourname{yourname} is the name of super-user created aforementioned.
Give rights to wheel group
nano /etc/sudoers{*} Use CTRL+W to look for “%wheel” and uncomment (remove #) to allow the wheel group to “execute any command”.
{*} Use CTRL+0 and Enter to Save, then CTRL+X to Exit nano.
18. DESKTOP ENVIRONMENT (DE) installing
Install the X Window System
pacman -S xorg xorg-xinitNetwork and Printing
That’s just the infrastructure. We need more packages (a lot more). It’s now time for your decision making, Internet & Wi-Fi connection method.
+ Option 1: use NetworkManager with wpa_supplement, for this we have to use: iw networkmanager network-manager-applet
+ Option 2: use Networkd with iwd, but it’s wi-fi only (no ethernet), for this: iw iwd systemd-resolvconf
My recommendation is ‘Option 1’. If so, our next command will be:
pacman -S iw networkmanager network-manager-applet firefox cups cups-pdfBy the way, here we activate the printing service:
systemctl enable cupsVideo Card Driver setup
Depending on your system, select one set that matches your video card.
* for most open-source video card drivers:
pacman -S xorg-drivers* for propriety Nvidia Optimus (hybrid video card):
pacman -S nvidia nvidia-dkms nvidia-prime nvidia-settings nvidia-utils libinput libxnvctrl opencl-nvidia xf86-input-libinput xf86-input-vmmouse xf86-video-fbdev xf86-video-intelAfter the above mentioned (full) command is completed, remove the below package with this command:
pacman -Rns xf86-video-vesa{1 more step later} we will install 1 additional package “prime-switcher” after installing YAY in a later section.
Desktop Environment or Windows Manager?
It depends. What’s your system? What’s your purpose to use Arch Linux? For most users, it’s Desktop Environment (DE) to go. However, even as you decided to go with DE, the 2 “what” questions still arise. So, decision is yours to make.
In this tutorial I show you how to install and configure 3 DE: Budgie, Gnome, and Mate. Also I’ll introduce you with most useful packages (apps) to use with these DE. For other Desktop Environment, please refer to Arch Wiki guide: https://wiki.archlinux.org/title/Desktop_environment
BUDGIE DE install
Budgie DE is modern with contemporary layout. However, it depends a bit on Gnome. I use Budgie DE on my daily drive, because I love its beauty & simplicity. To install Budgie DE, follow the below steps:
pacman -S budgie-desktop budgie-desktop-view budgie-extras budgie-screensaver lightdm lightdm-gtk-greeter lightdm-gtk-greeter-settings light-locker gnome-control-center gnome-terminal gnome-code-assistance gedit nautilus file-rollerAbove command installs necessary packages for running Budgie DE. You may see there are “gnome” packages in this installation. Those are needed to operate & manage Budgie DE. Furthermore, we will do additional configuration:
nano ~/.xinitrcAdd the following lines to this file:
export XDG_CURRENT_DESKTOP=Budgie:GNOME
exec budgie-desktop
{*} Use CTRL+0 and Enter to Save, then CTRL+X to Exit nano.
Now we activate lightdm:
systemctl enable lightdmGNOME DE install
As you can see in the aforementioned “Budgie DE” section, it depends on GNOME. In my opinion, and that’s how I do, install GNOME as the baseline for Budgie to function flawlessly. On the other hand, ‘base’ GNOME packages will take only around 1Gb – less than a USB drive these days – so I install both DE.
pacman -S gnome gnome-code-assistance gnome-nettool gnome-sound-recorder gnome-tweaks gnome-usageAnd that we have GNOME installed, we will configure it to run if selected at the login screen.
nano ~/.xinitrcAdd the following lines to this file:
exec gnome-session
{*} Use CTRL+0 and Enter to Save, then CTRL+X to Exit nano.
MATE DE install
Mate DE is lightweight, simple, elegant in its field supporting not-so-strong computers. If you tweak it and rearrange its layout, Mate DE will look nice while being light & fast. So, my second choice for DE is Mate, if not using Budgie.
pacman -S mate mate-extra lightdm lightdm-gtk-greeter lightdm-gtk-greeter-settings light-locker varietyNext, it’s to configure entrance for Mate DE:
nano ~/.xinitrcAdd the following lines to this file:
exec mate-session
{*} Use CTRL+0 and Enter to Save, then CTRL+X to Exit nano.
Now we activate lightdm:
systemctl enable lightdm19. RESTART Arch Linux
Okay, we’ve accomplished the most important part of the installation. It’s now time to boot our newly installed Arch Linux. For this, first exit root working directory:
exitNow that you’re back in “root@archiso” prompt, execute this command to reboot:
rebootRemember to remove the installation USB-drive.
{*} Instead of “reboot”, you can turn off the system (to go for a coffee or so) with either “poweroff” command or “shutdown now” command.
POST-INSTALLATION
If you stop right now, you’ll have a system that runs properly with a Desktop Environment that lets you use Graphical User Interface (GUI) applications. However, it’s just the “basic” (infrastructure) so far, without office apps nor useful utilities. Therefore, we need to do just a little bit more here.
20. BIOS boot sequence/order
Reboot/turn-on your system, at the very first screen when power-up press F1 or F2 or F10 or any other key according to your system’s guide on how to log in to its BIOS settings. For which key to press and how to enter BIOS, you can read more here: https://www.wikihow.com/Enter-BIOS. In BIOS, at Boot Sequence/Order set 1st boot device to Arch Linux boot/efi partition.
21. System network configuration
In section “18. Desktop Environment (DE) installation” at part “Network and Printing” there were 2 options for you to select. And this tutorial went on with my recommendation “Option 1” using NetworkManager. So, here we proceed with that choice. Later in this section I also will show you how to configure network with “Option 2” using Networkd & IWD.
But first, we proceed with “NetworkManager” as it’s easy & simple.
Enable & start services
Assuming that you have installed networkmanager and network-manager-applet. As you’ve logged in using your super-user account (instead of root, which is not recommended), commands from this section on use “sudo”.
sudo systemctl enable NetworkManager
sudo systemctl start NetworkManager
{Case sensitive} Notice to type exactly “NetworkManager“. If not, you’ll receive an error message.
Set up wi-fi connection
Click the “network” icon on taskbar to connect to your wifi connection, or go to Menu and open “Advanced Network Configuration” to add a wifi. However, if you want it the “command line” way, then type these in the Terminal:
sudo nmcli device wifi list
sudo nmcli device wifi connect SSID password PASSWORD
(SSID = the wifi device; PASSWORD = WPA/WPE requested password)
(optional) Set up Additional DNS servers
By default, system DNS setting is quite “amazingly slow” (true in my case, Vietnam). So for me, I often use DNS server from Cloudflare and/or Google to speed up my wi-fi connection. If you want to do so, please follow the steps hereinafter.
Go to Menu, open “Advanced Network Configuration”, select your wifi, and click on the “gear icon button” (Edit the selected connection).
Select tab “IPv4 Settings“, and set the following:
+ in “Method”, set it to “Automatic (DHCP) addresses only“; and
+ in “Additional DNS servers” set this: 1.1.1.1, 8.8.8.8
Select tab “IPv6 Settings“, and set the following:
+ in “Method”, set it to “Automatic, addresses only“; and
+ in “DNS servers” set this: 2606:4700:4700::1111, 2001:4860:4860::8888
22. SECURE BOOT setup
Read Arch Wiki for up-to-date instructions, search for “Unified Extensible Firmware Interface / Secure Boot”. For me, it’s simple, manually activate/deactivate “Secure Boot” in BIOS for booting into “secure” MS Windows 10/11 or “free” Arch Linux BTW. Do it that way because I don’t want to mess up things with manual keys.
23. USER’S DIRECTORIES
User’s directories are those commonly seen like Documents, Pictures, Musics… which locate in Home folder. For those, Arch Linux automatically installs & configure xdg-user-dirs, but if it’s not, run the following commands:
sudo pacman -S xdg-user-dirs
xdg-user-dirs-update
24. ADDITIONAL PACKAGES
As said in the “Post-installation” section, we have to install additional packages for Arch Linux to operate flawlessly with Graphical User Interface (GUI) apps. You may look into Arch “Packages” for more details, https://archlinux.org/packages/.
A long command
The following command will install quite a lot of packages. You can check what each one is in Arch “Packages” and decide which to keep which not. Also, you can just install all these packages, and later if you don’t need one just remove them with “sudo pacman -Rns” command. It’s up to you.
sudo pacman -S alsa-firmware alsa-plugins alsa-utils bind bleachbit clamav dconf dconf-editor ffmpeg ffmpegthumbnailer fwupd fwupd-efi gparted gvfs hplip hwdetect hwinfo inetutils intel-ucode jre-openjdk laptop-detect mkinitcpio mkinitcpio-busybox mkinitcpio-nfs-utils mkinitcpio-utils mousetweaks neofetch net-tools nfs-utils ntfs-3g openconnect openssh openvpn p7zip pacman-contrib pcmanfm plank rsync samba simple-scan tar tlp transmission-gtk tree ttf-liberation ttf-opensans noto-fonts noto-fonts-extra ufw ufw-extras gufw unrar usbutils util-linux webp-pixbuf-loader wireless-regdb wireless_tools zsh adapta-gtk-theme arc-gtk-theme arc-icon-theme elementary-icon-theme gtk-theme-elementary materia-gtk-theme papirus-icon-theme languagetool fcitx5 fcitx5-configtool fcitx5-gtk code python python-pip python-virtualenv libreoffice-fresh nano blender clementine gimp inkscape obs-studio shotcut vlc{Reinstall? Replace?} If asked, just say yes.
Graphical User Interface (GUI) system
Our goal is to set up a system that mainly operates on Graphical User Interface (GUI). This means less using commands on Terminal Emulator. For this goal, there are still few more steps ahead.
25. YAY installation
Yay! That sounds pretty optimistic and fun, right? And YAY is very helpful to install AUR packages. First, we need some prerequisite tools:
sudo pacman -S --needed git base-develClone the repository to your local storage. Do not use “sudo” here! If you do, your download will be owned by root, but you can not compile the package as root.
git clone https://aur.archlinux.org/yay-git.gitChange the permissions of the folder, and navigate to it:
chmod 777 yay-git
cd yay-git
Build the package. Also, do not run below command as “sudo” root user; otherwise, it will raise an error.
makepkg -siNow that YAY is installed, we can use it to install AUR package with the command: “yay -S package-name” (similar to pacman -S package-name). However, there is another way with full GUI support from install to remove and update packages (both official and AUR). It’s “pamac”.
26. PAMAC – a graphical Package Manager
Install PAMAC with YAY
yay -S pamac-aur{When asked} Choose “pamac-aur” (default=1).
{“Diffs to show?”} When being asked this, type “N” for None.
{no “sudo”} Please notice above command use no “sudo”.
After that, we have to replace a package in pamac-aur:
yay -S archlinux-appstream-data-pamac{Replace?} When being asked, choose “yes”.
Add/Remove Software
Next, open “Menu” and look for “Add/Remove Software“. The position of this in the “Menu” depends on your Desktop Environment. However, it’s not hard to find “Add/Remove Software”. Click to open it.
{*} You can use Terminal command to open it also. Type this in Terminal: pamac-manager
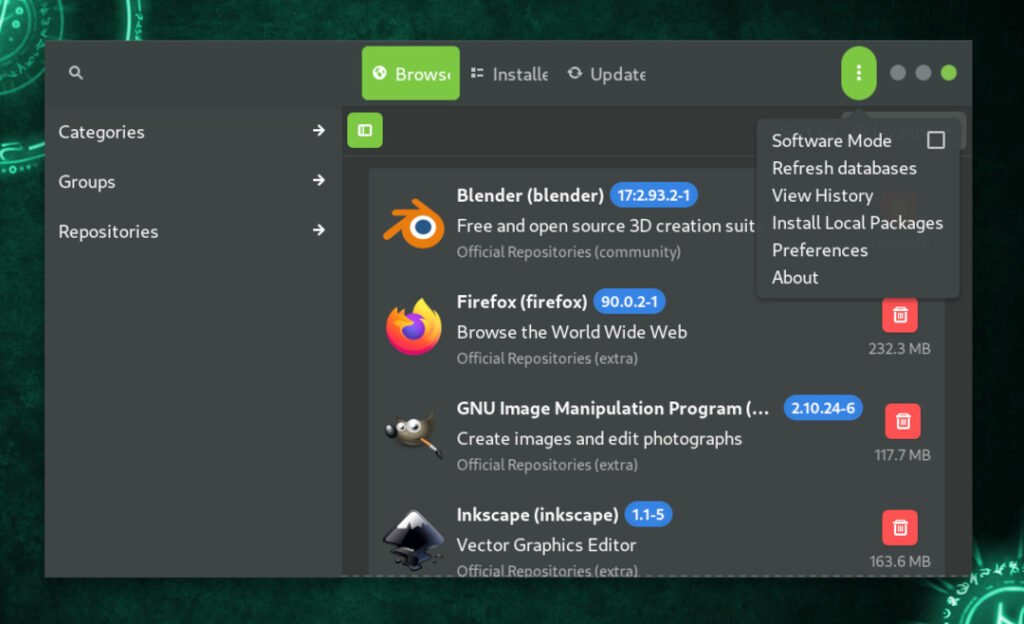
In “Add/Remove Software”, click on the “3 dots” icon, select “Preferences”.
Next, select “Third Party” tab, and check/enable “Enable AUR support”.
Also check/enable “Check for updates”.
Okay, relax & enjoy Arch Linux! From this point forward almost everything can do from Graphical User Interface (GUI). Install/Remove/Update all can do via Add/Remove Software (pamac-manager).
Some interesting AUR package
prime-switcher
Remember “prime-switcher” I mentioned in section “18. Desktop Environment (DE) installing”? In that section, at the part “* for propriety Nvidia Optimus (hybrid video card)” I said there is 1 more package to install after YAY. So, now we do it either with Add/Remove Software (pamac-manager) or terminal command as below:
yay -S prime-switcherSome other packages
Additionally, below are several other packages for Budgie/Gnome/Mate DE. Those you may consider installing onto your system. However, everything is up to you.
+ Icon & theme: avatar-theme-neru, mate-neru-canta-theme, neru-icon-classic-theme
+ Budgie DE windows manager: budgie-windowshuffler
+ Internet browser: chrome, brave
+ Code OSS accessories: code, code-features, code-marketplace, code-minimap
+ Terminal Emulator: terminator, spacefm
+ System backup: timeshift
xbindkeys
If some special keys on your keyboard not functioning as designed, for example: [Print Screen], [Volume +/-], install the following: xbindkeys, xbindkeys_config-gtk2
{xbindkeys} uses for binding keyboard to specific command, for example: printscreen, scroll lock, pause/break; you can read more about it here: https://wiki.archlinux.org/title/Xbindkeys#Configuration
27. Enjoy Arch journey!
There are plenty more things to learn about Arch Linux. Certainly, this tutorial is just to help you with the few startup steps into the long & joyful journey named Arch Linux BTW. Enjoy!
What’s next? If you’re interesting in Cyber Security or Penetration Testing, please go for “BlackArch how to install – 2021” https://viws.net/blackarch-how-to-install-2021/. Video of this tutorial is here: https://youtu.be/PTrtfAo70Dg

2 Comments